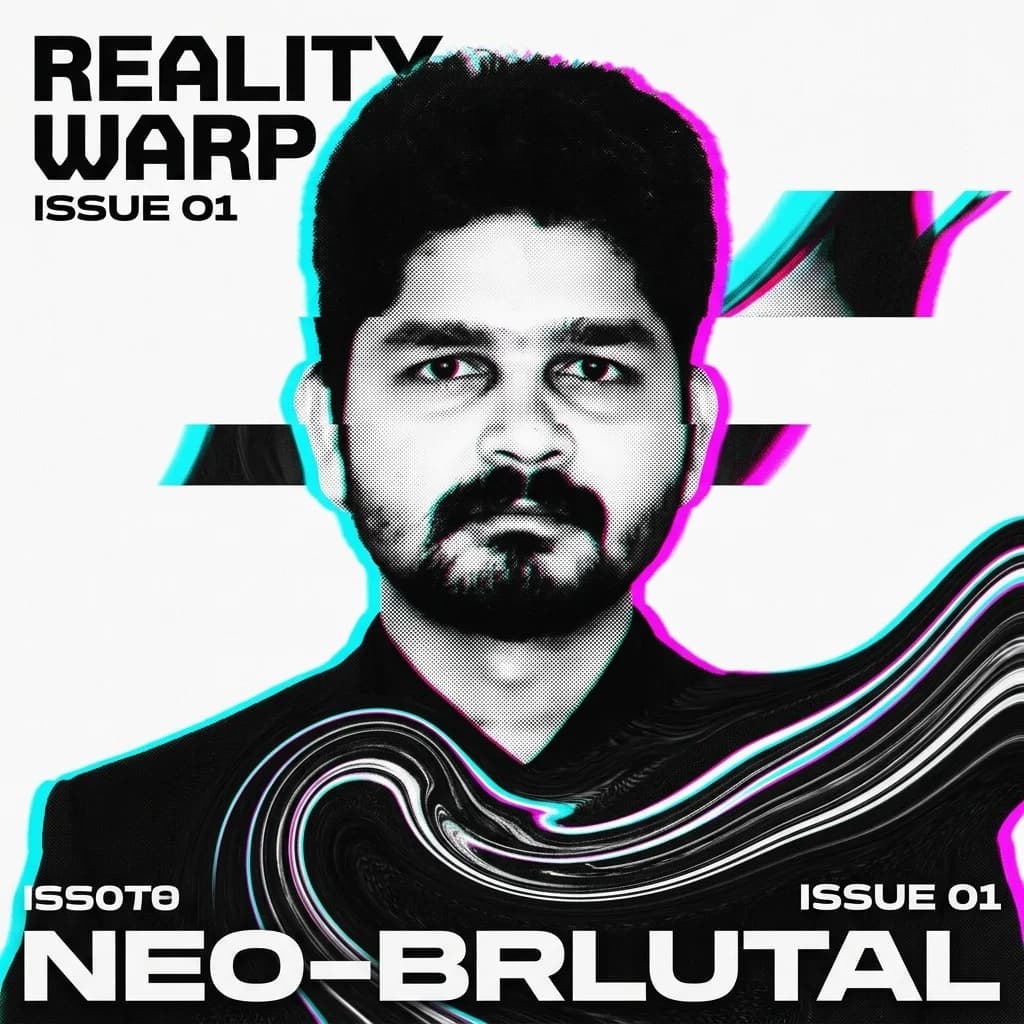
Unveiling the Reality Warp Editorial Aesthetic
The digital art landscape in 2026 has witnessed a massive rebellion against clean, sterile, and AI-flattened images. Leading the charge is the Reality Warp Editorial style—an edgy, high-contrast aesthetic that blends classic high-fashion studio photography with glitch-art, fluid liquification, and bold neobrutalist design grids. Often featured on the covers of cutting-edge street fashion magazines, this style represents a perfect fusion of organic human posture and aggressive digital disruption.
To demonstrate this powerful creative pipeline, we are using a real studio portrait of our founder, Laxman Kumawat, featuring a man in a sharp black suit and black shirt set against a crisp, solid white background. We will walk you through the exact digital editing steps—from the initial raw capture to a warped, chromatic editorial masterpiece that is ready for print or web publication.
📌 KEY TAKEAWAYS: 5-PHASE WORKFLOW
- Phase 1: Stark Silhouette: Isolate the high-contrast suit portrait against a clean backdrop.
- Phase 2: Slicing & Distortions: Slice the image geometrically or layer double-exposures.
- Phase 3: Liquification / CRT Grids: Stretch fabric edges or map phosphor CRT screen curves.
- Phase 4: Color Aberration / Earthy Grading: Split RGB channels for lens effects or map earthy earth tones.
- Phase 5: Swiss Print Typography: Anchor the graphic inside a high-end structured coordinate grid.
📸 THE METAMORPHOSIS: RAW VS WARPED 📸

Traditional Studio Portrait
Stark white backdrop, sharp geometric posture, and deep black velvet fabric textures. The high contrast provides the perfect foundation for digital edge tracing.

Dimensional Reality Warp
Multidimensional slicing along the facial grid, liquid stretching of the black suit outline, neon blue/magenta shifts, and Swiss typography overlay.
Step-by-Step Technical Guide
Creating a premium Reality Warp Editorial style image is not about random filters—it is a calculated pipeline that balances structure and distortion. Follow this detailed step-by-step breakdown using standard design software like Photoshop, Figma, or your favorite digital drawing toolkit.
Step 1: Selecting and Preparing the Raw Asset
The success of the warp depends heavily on your starter image. The ideal raw photo must feature:
- Stark Contrast: Dark clothing against a pure white or very light background. The solid black outline of the suit jacket provides clear geometric limits that are easy to isolate and manipulate.
- Sharp Lines: High-resolution focus on hair contours, jacket collar, and posture. Fuzzy or soft-focus images will smudge awkwardly when warped.
- Neutral Posture: A solid facing or three-quarter posture allows the geometric slices to cut clean across facial coordinates without looking disorganized.
Pro Tip: Use the Pen Tool (P) or a Magic Lasso to create a clean mask around the subject, isolating them onto their own layer above the background canvas. Keep the background pure white (#FFFFFF) to preserve that crisp magazine layout.
Step 2: Slicing & Geometric Offsets
The first sign of reality breaking is "dimensional slicing"—breaking the continuous physical lines of the portrait into horizontal blocks.
- Select your isolated subject layer.
- Using the Rectangular Marquee Tool (M), draw a horizontal strip cutting straight through the canvas. Good anchor coordinates include the bridge of the nose, the line across the chin, or the shoulder seam of the black suit.
- Press
Ctrl + J(Windows) orCmd + J(Mac) to duplicate that slice to a new layer. - Activate the Move Tool (V) and shift the slice horizontally by 15px to 30px (either left or right).
- Repeat this process 3 to 4 times across different vertical points of the body, alternating the shift directions to create a jagged, Staggered grid.
Pro Tip: Keep some slices very thin (5px) and others wide (80px) to establish a dynamic visual rhythm. Do not shift the eyes too far, or you will lose the soul and identity of the portrait.
Step 3: The Liquid Warp (Liquify Manipulations)
Now, we introduce organic fluidity to balance the sharp geometric slices. This is where the black suit outline stretches like liquid oil across the white space.
- Merge your shifted slices onto a single layer (but keep a backup of the original portrait layer just in case!).
- Open the Liquify Filter (Ctrl+Shift+X).
- Select the Forward Warp Tool (W) on the left panel.
- Configure your brush settings on the right panel. For a standard 3000px portrait, use these exact parameters:
- Click inside the solid black suit jacket near the shoulder or sleeve, and sweep outward into the white background in long, smooth, curving strokes. The black fabric will stretch and flow gracefully like liquid ink.
- Create 2 or 3 beautiful fluid tails flowing out from the jacket's outline, letting them taper off into the white canvas.
Pro Tip: Sweep the hair contours and the chin details in the same direction as the jacket flows to build a unified motion vector across the entire artwork.
Step 4: Color Channel Splitting & Chromatic Aberration
To give the warped image its vibrant, electronic editorial feel, we simulate lens refraction errors (chromatic aberration) along the high-contrast boundaries of the black suit and white background.
- Duplicate your warped portrait layer twice, so you have three identical layers in total. Rename them: RED, GREEN, and BLUE.
- Double-click the RED layer to open the Layer Style panel. Under Advanced Blending, uncheck the G (Green) and B (Blue) channels, leaving only the R box checked. Click OK. The layer will turn solid cyan when isolated, but looks normal when stacked.
- Double-click the BLUE layer, and uncheck the R and G channels, leaving only the B box checked. Click OK.
- Now, select the RED layer and move it 4px to 6px to the left using your keyboard arrow keys.
- Select the BLUE layer and move it 4px to 6px to the right.
- Instantly, you will see glowing neon cyan and hot magenta fringes bleeding out from the edges of the black suit and face, creating a premium high-fashion lens refraction effect!
Pro Tip: If you want an extra glow, apply a subtle Gaussian Blur (0.5px to 1px) to the shifted RED and BLUE layers. This blends the neon edges smoothly into the stark backdrop.
Step 5: Switzerland Editorial Grid & Neobrutalist Typography
The final touch is anchoring this digital disruption within a structured, modern layout. This mimics Swiss-style print grids and modern streetwear brand aesthetics.
- Bold Neobrutalist Borders: Add a thick, solid black outer frame (5px to 10px) around the canvas to give it a solid graphic presence.
- Industrial Overlays: Add small technical markings in the corners—like alignment crosshairs, a barcode symbol, coordinates (e.g.
COORD: 20° 26' N / 72° 58' E), or an arrow icon. This makes the artwork look like a technical blueprint or a high-end streetwear print. - Dynamic Swiss Typography: Use geometric sans-serif fonts (like Inter, Outfit, or Space Grotesk) in contrasting weights. Overlay bold vertical text along the margins (e.g.
REALITY WARP // SERIES 01) and add a tiny, clean description block at the bottom describing the technical specs of the artwork.
💡 EXPERT TIPS FOR A WORLD-CLASS WARP 💡
- Maintain Fabric Shadows: When warping the black suit, don't crush the shadows entirely. Keep subtle grey lighting details on the fabric folds so it retains its premium, physical texture instead of turning into a flat shape.
- Visual Weight Balance: Keep the face relatively intact to preserve human expression and facial aura, while going wild and aggressive with the warping on the lower third of the suit jacket.
- Vector Smart Objects: If you are working in Photoshop, convert your portrait layer into a Smart Object before applying the Liquify filter. This allows you to go back and tweak the curves or density at any time without destroying the pixels.
- Combine with AI Prompts: If you want to automate this or generate background assets, combine your manual edits with a Stable Diffusion Image-to-Image pass, using prompts like
"Reality warp editorial, high contrast, liquid metal suit outline, chromatic lens aberration, Swiss typography, sharp 8k studio photo".
❓ FREQUENTLY ASKED QUESTIONS (FAQ)
Q: What file parameters are best when exporting the Reality Warp warped design?
A: For digital display, export as a 24-bit PNG with sRGB profiles active. If printing for editorial catalogs, convert to CMYK format with a minimum of 300 DPI, mapping the background oatmeal highlights to paper ink limits.
Q: Can I achieve these graphic distortions using free alternative software?
A: Yes! You can duplicate the entire Reality Warp slicing, liquifying, and channel splitting workflow inside GIMP (using the warp transform tools) or Photopea (a free web-based designer), matching our technical values exactly.
Conclusion: Go Cook Your Masterpiece! 👑
The Reality Warp style is the ultimate way to inject absolute artistic aura into a standard studio photo. By taking a high-contrast raw portrait—like Laxman Kumawat's signature black suit photo—and carefully slicing, liquifying, and color-channel shifting it, you create a premium piece of editorial art that stands out instantly from generic digital graphics. Get your layers ready, open up those channel properties, and start warping your own reality today! Stay based!